Intro:
Pi’s are awesome, the Lightning network is awesome! So what could be cooler than combining them? While I’m delighted with my Pi lightning node, it wasn’t easy getting here. If you have a perfectly good Ubuntu machine sitting around you may want to set this up there instead. However, if you are as stubborn as me and determined make your pi do some awesome, then continue!
There are all kinds of things that can go wrong, I encountered many, many ways for things to go wrong, most of which I’ll note below. It will take some time to get a pi lightning node up and running. I encourage you to read this tutorial all the way through before starting, and maybe even read a few of the other tutorials, video’s, and resources that we linked to at the bottom.
I set my pi up with bitcoind and lnd.
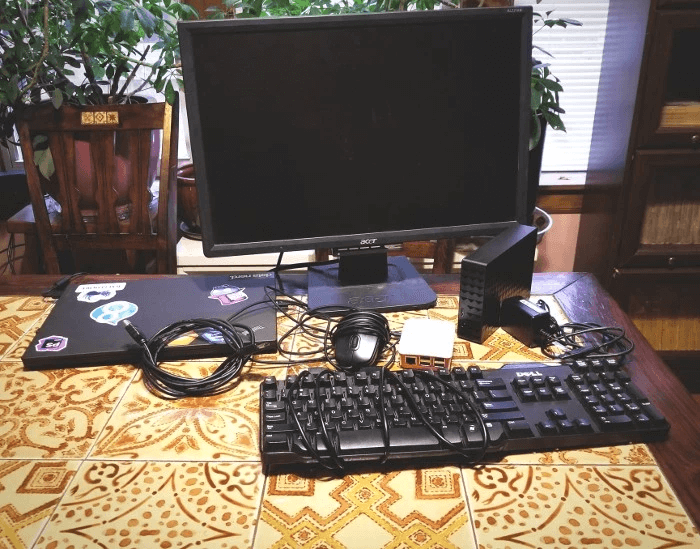
Things you’ll need:
Raspberry Pi with a good charger. (I’m using Pi 3 Model B with 64GB SD card, 2.5A charger) -USB keyboard -USB mouse -Monitor (with an HDMI connection) -A wifi connection with a router that you can access. -External hard drive Note: I’m using an externally powered, 3TB Seagate Expansion drive. This is much more heavy duty than what is needed. However, I ran into some trouble getting enough power to my Pi to run a simple USB external drive, so this was simpler for me. -Lot’s of outlets to plug all your things into so you won’t get in trouble for unplugging your spouses beer fridge. -And lastly, patience. We are working with beta software, this is not likely to be a smooth process.
Assumptions:
I’m assuming that you have somewhat of a technical background and are comfortable with a linux command line.
You know some basic networking, port forwarding, etc.
I’m also assuming that your Raspberry Pi is up and running on Raspbian or a debian based Linux.
The (long) Process:
FYI: Getting a Pi to sync with the blockchain can take a LONG time! …like a good week. If you have an existing bitcoin node you can connect LND to that node. You’ll need to setup your lnd config with the ip and port of your existing node and likely you’ll need to do some port forwarding to get the to talking to eachother. In this case you can skip down to the installing LND section.
Prep the pi
I’ll be working on my Pi mostly through SSH. First things first, we need to enable SSH on our Pi. https://www.raspberrypi.org/documentation/remote-access/ssh/ Note: After SSH is enabled, by default any computer on the same network as a Raspbian Pi will be able to SSH in with pi@[ipaddress] and password ‘raspberry’. You’ll want to update your password. If you plan to use this node on mainnet, you’ll want to get serious about security and disable password authentication and use key’s instead. This post on setting up a full note has lots of good ideas for more secure configuration.
https://medium.com/@meeDamian/bitcoin-full-node-on-rbp3-95314e828704
For security reasons we’ll set up a new user who will be running bitcoind and lnd. I’m calling my user ‘bitcoin’.
$ adduser bitcoin
Set a decent password, etc.
If you want to give your user sudo access, add this line “bitcoin ALL=(ALL:ALL) ALL” to /etc/sudoers below the same entry for root.
$ sudo su bitcoin to switch to your new user.
Next format the external drive. I did this on my Ubuntu laptop. — plug it in and look for it in the command line $ df -h
— note where the device is mounted. — first unmount the device $ sudo umount /dev/sdb2
— Then reformat as NTFS, or whatever you like. $ sudo mkfs.ntfs /dev/sdb2
On my 3T drive this took a while!
As I reformatted as NTFS, I installed ntfs on my pi. $sudo apt-get install ntfs-3g
If all goes well you should be able to just plug it in, SSH in, run $ lsblk, or $ fdisk -l and see the drive listed.
Note where it’s mounted and create a mount point. $ mkdir data
You may need to unmount it first $ sudo umount /dev/sda2
$ sudo mount /dev/sda2 /home/bitcoin/data
To ensure it stays mounted through reboots, you can edit /etc/fstab.
Adding “/dev/sda2 /home/bitcoin/data ntfs-3g rw,default 0 0” to the file should work. Note that this drive will be mounted for the bitcoin user.
You can also use $ sudo blkid to get the UUID and use that instead of the mount location.
Network stuff
I did all kinds of things to my router during this process. I wanted to be able to ssh into my pi while working outside the home. (This isn’t very secure. I would not recommend it for mainnet.)
You’ll want to give your pi fixed ip so that other nodes can stay connected to it.
Be sure to open and forward these ports on your router, 8333 for bitcoin mainnet, 18333 for bitcoin testnet and port 9735.
Install bitcoind
Now on to installing bitcoind! You can of course use another bitcoin implementation, but the below instructions are for bitcoind.
If your Pi isn’t new, you might want to updating things first…
$ sudo apt-get update$ sudo apt-get upgrade$ sudo apt-get dist-upgrade$ sudo apt-get autoremove
FYI: If you’re running ubuntu installing bitcoind is quick and easy. This guide will walk you though it. https://bitcoin.org/en/full-node#ubuntu-1604 On Raspbian it’s a bit of a pain. We’ll walk though Raspbian based instructions below.
First up, get loads of dependencies…
Don’t play around with Raspbian’s ppa sources files too much or you might find that raspbian will have a very hard time finding these packages!
$ sudo apt-get install git build-essential autoconf libssl-dev libboost-dev libboost-chrono-dev libboost-filesystem-dev libboost-program-options-dev libboost-system-dev libboost-test-dev libboost-thread-dev libtool libzmq3-dev libevent-dev libtool libboost-all-dev libminiupnpc-dev qt4-dev-tools libprotobuf-dev protobuf-compiler libqrencode-dev db4.8-util -y
And then there is still more…
We need a specific version of BerkeleyDB.
$ wget http://download.oracle.com/berkeley-db/db-4.8.30.zip$ unzip db-4.8.30.zip$ cd db-4.8.30$ cd build_unix$ ../dist/configure — prefix=/usr/local — enable-cxx$ make$ sudo make install$ cd
And now to actually install bitcoind.
There are a few ways to do this. You can cloning the repo and build it yourself, or just download and verify the binary(Which is also much faster!). Those instructions will follow these.
repo version…
First lets have a look at the repo and see what the latest version is, https://github.com/bitcoin/bitcoin/branches. As I’m typing this it’s 0.16, so I’ll clone that branch.
$ git clone -b 0.16 https://github.com/bitcoin/bitcoin.git$ cd bitcoin/$ ./autogen.sh$ ./configure$ make$ sudo make install
That last command is going to take a while, as in hours.
Binary version…
$ cd Downloads$ wget https://bitcoin.org/bin/bitcoin-core-0.16.0/bitcoin-0.16.0-arm-linux-gn…$ wget https://bitcoin.org/bin/bitcoin-core-0.16.0/SHA256SUMS.asc$ wget https://bitcoin.org/laanwj-releases.asc$ sha256sum — check SHA256SUMS.asc — ignore-missing
In the output you should see… “bitcoin-0.16.0-arm-linux-gnueabihf.tar.gz: OK” $ gpg ./laanwj-releases.asc
Hopefully you’ll get … “01EA5486DE18A882D4C2684590C8019E36C2E964” $ gpg — import ./laanwj-releases.asc$ gpg — verify SHA256SUMS.asc
You want to see…”Good signature from Wladimir …” and…01EA 5486 DE18 A882 D4C2 6845 90C8 019E 36C2 E964
Next, extract and install. (You’ll want to do this as your new bitcoin user.)
$ tar -xvf bitcoin-0.16.0-arm-linux-gnueabihf.tar.gz$ sudo install -m 0755 -o root -g root -t /usr/local/bin bitcoin-0.16.0/bin/*
Check that it’s working.
$ bitcoind — version
If you see “Bitcoin Core Daemon version v0.16.0” you’re in business!
Now let’s create a directory on our external drive for our testnet data.
$ cd data
$ mkdir bitcoin_testnet
Then we’ll create a sim link from the bitcoin data directory to our bitcoin_testnet directory.
$ ln -s /home/bitcoin/data/bitcoin_testnet /home/bitcoin/.bitcoin
Now comes the fun part! Let’s configure bitcoind!
Configure bitcoind
$ In /home/bitcoin/.bitcoin
$ touch bitcoin.conf
This is a good place to get an overview of what options there are in the config file, https://github.com/bitcoin/bitcoin/blob/master/contrib/debian/examples/bitcoin.conf
Also Blockchain developer Jameson Lopp has a bitcoind config generator available at, https://jlopp.github.io/bitcoin-core-config-generator/
Below I’ll walk through the options I chose for my node…
# bitcoind configuration file
# We’ll be running this on the test networktestnet=1
# Here is a special folder for this node#datadir=/home/bitcoin/.bitcoin
# Show the loveuacomment=BOBChicago
# ^^^ Note: If you set the user agent to a custom string, you shrink your anonymity set.## If you are interested in obscuring the fact that you are running a bitcoin# node you can route traffic through TOR. In this case you will want to unset# your user agent comment.#proxy=127.0.0.1:9050
# Publish rawtxzmqpubrawtx=tcp://127.0.0.1:6164
# Index transactionstxindex=1
# Set up RPCserver=1rpcuser=userrpcpassword=passrpchost=127.0.0.1rpcport=6163
# Raspberry Pi optimizationsdbcache=100maxorphantx=10maxmempool=50maxconnections=40maxuploadtarget=5000
Now let’s try to set bitcoind up to run in the background. …or just start it up with this command…
$ bitcoind — daemon -server
Let’s exit the bitcoin user.
$ exit
and create a config file.
$ sudo nano /etc/systemd/system/bitcoind.service
Add the below to that file and save…
[Unit]Description=Bitcoin daemonAfter=network.target
[Service]User=bitcoinGroup=bitcoinType=simpleExecStart=/usr/local/bin/bitcoind
[Install]WantedBy=multi-user.target
Then enable the service and restart your pi. $ sudo systemctl enable bitcoind.service$ sudo shutdown -r now
Wait a min and then reconnect to your pi and check that the service has started and that the testnet blockchain is being downloaded.
And check the status of the service with $ systemctl status bitcoind.service
Now we can use the bitcoind command line tool to get some info about the blockchain. $ bitcoin-cli -rpcuser=user -rpcpassword=pass -rpcport=6163 getblockchaininfo
If you see this message… error code: -28error message:Loading block index…
You’re Pi is still syncing with the blockchain…wait a week! Well, have lunch and then check on it again, maybe tomorrow some time.
Once you can get a response from ‘getblockchaininfo’, you’ll still need to wait until “verificationprogress” is at least, 0.9999xxxx before you can use bitcoind. …waiting, this involves lots and lots of waiting.
Note: I ran into an issue where the pi would crash while syncing. I had to make sure that my pi optimizations were turned on in the config file and I turned dbcache down to 64 to prevent the crashes.
If you run into problems here is a list of error codes, https://github.com/bitcoin/bitcoin/blob/v0.15.0.1/src/rpc/protocol.h#L32L87
To watch bitcoind run or to check for errors… $ tail -f /home/bitcoin/.bitcoin/testnet3/debug.log
If you are looking to explore, here is a list of bitcoin-cli commands, https://en.bitcoin.it/wiki/Running_Bitcoin
Now that bitcoind is up and running and you can get a response from bitcoin-cli, let’s play with it a bit. We’ll need to setup a wallet, etc.
Let’s checkout the details of the wallet created by bitcoind $ bitcoin-cli -rpcuser=user -rpcpassword=pass -rpcport=6163 getwalletinfo
If we are running on mainnet, we’ll want to encrypt.
$ bitcoin-cli -rpcuser=user -rpcpassword=pass -rpcport=6163 encryptwallet PASSWORD_[D]$ bitcoin-cli -rpcuser=user -rpcpassword=pass -rpcport=6163 walletpassphrase PASSWORD_[D] 600
Know how to backup and restore $ bitcoin-cli backupwallet data/bitcoin_testnet/wallet_testnet.backup$ bitcoin-cli importwallet data/bitcoin_testnet/wallet_testnet.backup
Let’s go get some testnet coins(You can also get testnet coins from a lightning faucet as we’ll see below). We’ll need an address for that…
$ bitcoin-cli -rpcuser=user -rpcpassword=pass -rpcport=6163 getnewaddress
Copy the output and paste it here https://testnet.manu.backend.hamburg/faucet
If the address you generated didn’t start with a 2, it’s might not be a witness address. Testnet SegWit address start with a 2. To make it one…
$ bitcoin-cli -rpcuser=user -rpcpassword=pass -rpcport=6163 addwitnessaddress [your address]
Then transfer your funds there.
$ bitcoin-cli -rpcuser=user -rpcpassword=pass -rpcport=6163 sendtoaddress [New Address from above output]
And now finally, it’s time to set up LND!
Install lnd
You can follow along with the official install instructions here, https://github.com/lightningnetwork/lnd/blob/master/docs/INSTALL.md or use a binary as shown below.
At the moment v0.4.2-beta is the latest. $ wgethttps://github.com/lightningnetwork/lnd/releases/download/v0.4.2-beta/lnd-linux-arm-v0.4.2-beta.tar.gz
$ tar zxf lnd-linux-arm-v0.4.2-beta.tar.gz
$ cd lnd-linux-arm-v0.4.2-beta/
If we have an ‘lnd’ directory then we should be good. Copy ‘lnd’ and ‘lncli’ to /usr/bin to make life easier and let’s start it up.
$ lnd — bitcoin.active — bitcoin.testnet — debuglevel=debug — bitcoin.node=bitcoind — bitcoind.rpcuser=user — bitcoind.rpcpass=pass — bitcoind.zmqpath=tcp://127.0.0.1:6163 — alias=SomeAmusingName
After you start LND you should see the ‘.lnd’ in your user’s home directory.
Configure lnd
You can create a lnd.conf file there. Here is an example of what you might put there…
[Bitcoin]bitcoin.active=1bitcoin.testnet=1bitcoin.node=bitcoind
[Bitcoind]bitcoind.rpchost=localhost:6163bitcoind.rpcuser=userbitcoind.rpcpass=passbitcoind.zmqpath=tcp://localhost:6164
When you start up LND you’ll want to let it run in one terminal window, and open another to enter commands.
Type $ lncli to get a list of LND commands.
Let’s create a wallet, and enter a password(8+ characters) for it, and write down your seed! $ lncli create
You’ll need to unlock the wallet before lnd will let you do anything interesting.
$ lncli unlock
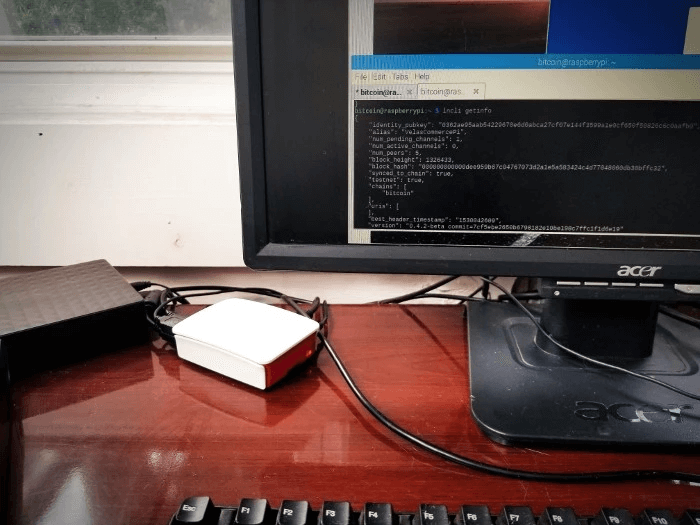
Note your public key, find it with… $ lncli getinfo
Note: I ran into another error here, `[lncli] rpc error: code = Unavailable desc = grpc: the connection is unavailable`. Sometimes this means you just need to wait a min, in my case this meant that I had somehow messed up the bitcoind config such that bitcoind was not listening for zmq on port 6164 as lnd was expecting it to. Commands such as $ nc -vz or $ netstat -a | more can help you sort out if that’s what’s happening to you.
Note: Even after lnd is up and running it will need time to read the blockchain from bitcoind. As with most things on the pi, this will take some time. Watch the output from the terminal where you started up lnd. It should be updating you on the syncing progress.
Now we need an address. $ lncli newaddress np2wk
Visit a faucet and get some $$$
https://faucet.lightning.community/https://testnet.coinfaucet.eu/en/https://lnd-faucet.bitbank.cc
But before we can do that we’ll need to connect to these faucet nodes and open a channel with them.
You’ll need some peers. Check how many you’ve got. $ lncli listpeers
We need to connect to other nodes. You’ll need the public key, ip address and port of a node that you would like to connect to.
$ lncli connect [pubkey]@[ip]:[port]
You can run the listpeers command again to see that it was successful.
Once your transactions have confirmed you can run $ lncli walletbalance
Note: amounts are displayed in Satoshis.
Once we are connected we can open a channel. With the above faucets you can get them to open a channel with you thus providing you with some funds.
Or if you have a friend with a node you can set up channels and send each other some transactions.
$ lncli openchannel — node_key=[pubkey] -local_amt=[number of satoshis to lockup in channel]
The output of that command should be the funding transaction id. LND requires 3 confirmations.
With Lightning payments you need to create an invoice prior to getting paid. To receive funds from one of your channels, first create an invoice. $ lncli addinvoice — amt=10001
The output should include a “pay_req” string. If you are attempting to send a payment to another node, you will first need this payment request. Once you have it, you can pay with the ‘sendpayment’ command.
$ lncli sendpayment — pay_req=[big long string]
You should receive a confirmation.
So there you go, you’re using the Lightning Network!!! It’s not easy, but it can be done!
You can look for your node on this testnet explorer, https://explorer.acinq.co/
Here are some other lncli commands that you should play around with a bit…
$ lncli listchannels$ lncli getnetworkinfo$ lncli channelbalance$ lncli lookupinvoice
If you run across issues that we haven’t covered here, we’d recommend checking out these guides as well…
Cool YouTube video example, https://www.youtube.com/watch?v=DLWkOqo0Tak
And here is an epic collection of lightning resources! https://lnroute.com/
Enjoy and good luck!
With such new stuff we’re all just figuring it out as we go. If you catch any errors in the above, please drop me a line and tell me about it! Find me on Twitter. @VelasCommerce or @hmichellerose
Note: Special thanks to Ian Shipman who assisted me through several rounds of troubleshooting.
0 Comments